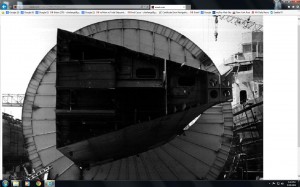
FRIG01a.JPG: In 1969, ten years before being beneficially influenced by the Maritime Administration created National Shipbuilding Research Program (NSRP), Avondale Shipyards erected destroyer-escort hulls in a unique way. Subassemblies, mostly stiffened deck and bulkhead panels, less bow and stern blocks, were assembled within giant wheels with just enough welding to hold them together. Then, each hull was rotated in order to facilitate down-hand welding of erection butts and seams.
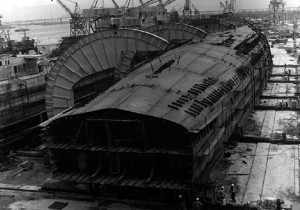
FRIG01b.JPG: In 1969, ten years before being beneficially influenced by the Maritime Administration created National Shipbuilding Research Program (NSRP), Avondale Shipyards erected destroyer-escort hulls in a unique way. Subassemblies, mostly stiffened deck and bulkhead panels, less bow and stern blocks, were assembled within giant wheels with just enough welding to hold them together. Then, each hull was rotated in order to facilitate down-hand welding of erection butts and seams. Rotating a hull required significant investments in a special wheel facility and its operation. Except for watertight doors, and perhaps some other hull fittings for which the steel shop had cognizance, integrated outfitting and painting was nil. For the most part, outfitters and painters had to work on board the hard way after each hull was erected. The extraordinary number of strong backs, shown at the right foreground, for aligning shell plates are indicators of the poor accuracy achieved by U.S. shipbuilders in 1969 for forming plates and producing subassemblies. That was well before the publication of “Process Analysis Via Accuracy Control – February 1982” (NSRP 0214), when there was insufficient understanding by shipbuilders outside of Japan about the absolute link between accuracy and productivity. Traditional shipbuilders did not appreciate that, “Accuracy Control (A/C) is not quality control nor is it similar.” Nor did they appreciate that, “A/C means the regulation of accuracy as a means for constantly improving design details and work methods so as to maximize productivity.”
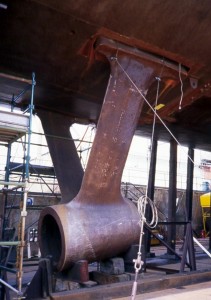
FRIG02a.JPG: Traditional shipbuilders fit each strut casting after hull erection. The centerline through the bore must align with a projected propeller-shaft line and at the same time, the strut palms, i.e., the part where the top of each strut is flared, must align with hull plating. Because of its complex shape, a strut casting is difficult and dangerous for riggers to handle when they hoist it into position under the stern and then maneuver it in order to buck it into alignment. Traditionalists rely on a significant material allowance on the inside diameter of each hub so that there is plenty of room for adjustment when a portable mill accomplishes final boring. The entire process features both unnecessary work and rework.
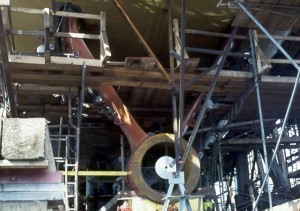
FRIG02b.JPG: Traditional fitting of a strut casting after a hull is erected, requires elaborate scaffolding for the welders who must apply multiple beads of exterior weld where each palm joins hull plating. Also, they have to weld the hard way, i.e., with their arms raised over their heads.
FRIG02c.JPG: In at least one instance during FFG-7 class construction, circa 1980, the hull was sagged so much that when the bore in the strut-casting was aligned to the projected propeller-shaft line, the strut palms projected too far down from the hull. Filler pieces and twice as much exterior welding were required. The electric heaters that are shown tack welded in place are used for preheating before welding. See photo FRIG02d for the costly rework that was necessary.
FRIG02d.JPG: Photo FRIG02c refers. Because this FFG hull was built with significant sag, its stern was higher from the projected propeller-shaft line than it should have been. A special high-tensile steel plate was purchased from a jobber. Two make-up parts, one for each strut, were made from it. A flat-oval was cut out of each part to accommodate the palms and the parts were beveled all around so as to achieve a degree of fairness. Also, the rework included extra welding that was not required by the original design. The hull sag is typical of that in FFGs built in a U.S. shipyard for the Royal Australian Navy (RAN). The RAN complained to the U.S. Naval Sea Systems Command (NavSea) that the sag in one vessel was so severe that its docking plan had to be revised. As a consequence, NavSea retained ABS Worldwide Technical Services (ABSWTS) to survey one vessel from each of the three FFG-building yards. ABSWTS retained JFK Photogrammetric Consultant Inc. of Indialantic, Florida to determine the as-built dimensions which ABSWTS compared to the design dimensions and to the contract requirements. See photo FRIG02d1.
FRIG02d1.JPG: Photo FRIG02d refers. Tables A and B are from “FFG Class Hull Form Investigation,” ABS Worldwide Technical Services, Report WTS 37244, April 1985, Volume I, Part III.
TABLE A shows how the as-built dimensions differ from design dimensions. Length overall (LOA), for example, is short by 6-1/4 inches in the best case and by 13-1/4 inches in the worst case. In comparison, frigate hulls built in a Japanese shipyard that commands statistical accuracy control, have no dimension, including LOA, differing from its design dimension by more than one centimeter.
TABLE B shows a similar comparison that takes into account construction tolerances allowed by the shipbuilding contracts. As shown, only 4 of the 15 principal dimensions were acceptable. Had there been command of statistical accuracy control, corrective measures would have been applied in process.
Also, during photogrammetric surveys, information of unprecedented accuracy is collected from photographs via analytical processes, not subjective interpretation. The surveys produce irrefutable evidence, such as in Tables A and B, of accuracy achieved. The Deputy Chief of Naval Operations, Logistics should require photogrammetric surveys before delivery of all construction for which dimensional tolerances are specified. Accuracy and productivity are directly related. Also, accuracy serves military requirements, for example, high-impact shock protection, maximizing submarine submergence depth, and facilitating quick repair of battle damage.
FRIG02e.JPG: While U.S. shipbuilders continue to struggle with rework that they regard as normal, IHI shipbuilders in Japan were reaping the benefits of statistical accuracy control. In the 1950s, product orientation, necessary for rationalized work flows, was introduced by Peter Drucker and statistical techniques were introduced to the Japanese by Dr. W. Edwards Deming. The Japanese shipyard managers devised a way for applying both to hull construction. As described in the publication “Process Analysis Via Accuracy Control” (NSRP 0214) hull blocks are best fit in the context of a ship design and not too each other. As a consequence there is no cumulative error. Deviations from designed lengths overall for frigate-type vessels are regularly less than one centimeter. IHI shipbuilders, with confidence, fit struts on block when stern blocks are upside down, even for a twin-screw destroyer, as shown in this photo. Reportedly, after hull erection, the finish cut by a portable boring mill, for achieving final alignment, is not more than ten millimeters.
FRIG02f.JPG: Upon learning about IHI accuracy achievements and their positive impact on productivity, Swan Hunter shipbuilders, in 1984, had improved accuracy enough to fit struts on block while constructing twin-screw Royal Navy frigates. Because there wasn’t total confidence, the forward struts were only temporarily fixed in position. Regardless, the rigging effort to set them in place on an upside-down block was nominal compared to the traditional effort of fitting them from beneath after a hull was erected. Their departure from tradition caused a significant improvement in safety, quality and productivity.
FRIG03a.JPG: In the early 1980’s, FFG-7 class non-machinery spaces were being outfitted and painted in grand blocks. While the method was somewhat more productive than what had existed before when hulls were completely built and then made available for outfitting and painting, workers were still system oriented. Often, within large such grand blocks, people continued to compete for access to work. Moreover, they still worked on ceilings with their arms raised over their heads. Note the scaffolding and temporary-service systems.
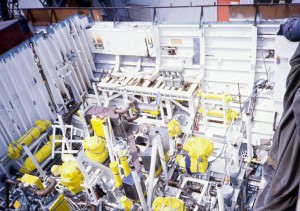
FRIG03b.JPG: The archaic practice of outfitting a FFG-7 class machinery-space piece by piece on board is shown (circa November 1983). Workers had to perform in dark, relatively confined areas. Since traditional system-by-system detail and arrangement drawings were used, each worker assigned to a specific system had to compete with workers assigned to other systems for access to work. Most of the time they were out of sight of their supervisors. That slowed down resolution of work conflicts and detracted from safety. Note the temporary lighting system and flexible air-duct system. Those, plus welding leads and hoses for oxygen, acetylene, and compressed air, congested hatches and passageway accesses.
FRIG03c.JPG: In the late 1970s and early 1980s, four FFG-7 class frigates were built for the Royal Australian Navy in a U.S. shipyard. Two more were ordered from a dockyard in Australia. Since only traditional detail and arrangement drawings were furnished, the Australians employed a blue-sky outfitting strategy for machinery spaces as shown in this photo. Further, many components were painted before they were landed on board. While the process was more effective than that shown in photo FRIG03b, productivity was significantly inhibited by the traditionally prepared detail design.
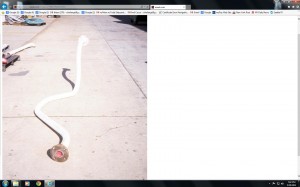
FRIG03d.JPG: In a traditional design organization, people are assigned responsibilities by system. For example, those with the largest-diameter pipe system or the most-important system are given first access to space available. Other system designers follow and have to work around the spaces already occupied. Further, in traditional design organizations, designers do not classify each pipe piece by the problems inherent in its manufacture. Traditional design managers do not employ any means for rating the productivity potential of their designs. Effective design managers monitor percentages of the easiest to manufacture pipe pieces as compared to those that are more expensive. Pipe pieces such as the cobra-shaped one shown for an Australian-built FFG-7 class ship, have deadly impact on productivity. The cobra has bends too close to its ends; flanges cannot be aligned and welded before bending. Moreover, the cobra has other than 45- and 90-degree bends. Odd-angle bends significantly impede statistical accuracy control of pipe piece production.
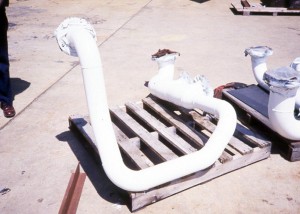
FRIG03e.JPG: Effective managers allow designers to conceive only three types of pipe pieces: straight, bent 45-degrees and bent 90-degrees. Further, effective managers direct that bends shall be a sufficient distance away from pipe ends so that the flanges may be aligned and fitted before bending. All exceptions have to have specific management approval. Where such rules are enforced, there is much less requirement for odd pipe pieces such as the one shown for an Australian-built FFG-7 class vessel. Pipe-shop productivity is predominantly determined in design!
FRIG03f.JPG: Effective managers allow designers to conceive only three types of pipe pieces: straight, bent 45-degrees and bent 90-degrees. Further, effective managers direct that bends shall be a sufficient distance away from pipe ends so that the flanges may be aligned and fitted before bending. All exceptions have to have specific management approval. Where such rules are enforced, there is much less requirement for odd pipe pieces such as the one shown for an Australian-built FFG-7 class vessel. Pipe-shop productivity is predominantly determined in design!
FRIG03g.JPG: Effective managers allow designers to conceive only three types of pipe pieces: straight, bent 45-degrees and bent 90-degrees. Further, effective managers direct that bends shall be a sufficient distance away from pipe ends so that the flanges may be aligned and fitted before bending. All exceptions have to have specific management approval. Where such rules are enforced, there is much less requirement for odd pipe pieces such as the one shown for an Australian-built FFG-7 class vessel. Pipe-shop productivity is predominantly determined in design! Except that the pipe pieces shown in this photo are for a FFG-7 class vessel being built in a U.S. shipyard.
FRIG03h.JPG: This photo shows a pipe arrangement against a passageway overhead in a U.S.-built FFG-7 class vessel. Since the fore and aft pipe runs are in a passage they are in parallel except near the bulkhead in the background. If this arrangement is discovered a thousand years after it was assembled, an archeologist could say with certainty that a system-by-system design organization was employed and that pipe-shop productivity was not among the best. Further, an archeologist could also deduct from the separate pipe supports that outfitting took place on board, or possibly on a grand block, with pipefitters working with their arms raised over their heads, i.e., the hard way. Also, this photo was obtained during a tour of the vessel in company with a senior manager of the design firm. He was asked, “Why are there separate supports for each pipe run?” He replied, “We have to make them shock proof.” When that statement was challenged he advised, “It’s true. We could also make common supports shock proof, but there is no way that we are going to have a meeting of five people every time we want to design a common support!” His experience was that of a system-by-system design organization wherein each designer is assigned responsibility for a single system and was not responsible for optimizing productivity. In a zone-oriented design organization, one detail designer would have responsibility for all pipes shown. Thus, one person could readily organize all pipes in parallel for assembly as an outfit unit on two common supports. Secondly, the design sequence would be the same as the production planned sequence so that information would be available in time for assembling the pipes and supports as an outfit unit early enough to land the unit on block when the block is upside down.
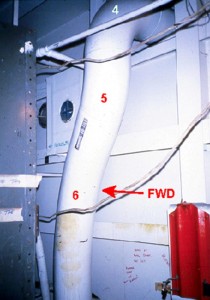
FRIG03i.JPG: The detail design for the large-diameter fuel-oil fill line in an Australian-built FFG-7 class vessel seems to be the consequence of an afterthought. (1) It penetrates a passageway overhead and while going aft, bends 90 degrees from the overhead and simultaneously about 30 degrees away from the bulkhead. (2) It continues aft by bending again so as to be parallel to the bulkhead. (3) It then bends 90 degrees and penetrates the bulkhead. See photo FRG03j.
FRIG03j.JPG: Photo FRIG03i refers. (4) Upon entering the machinery space the fuel-oil fill line bends 90 degrees downward. (5) It bends again, about 30 degrees, and heads aft in the direction it came from! (6) It bends once more about 30 degrees downward. Obviously, the complex arrangement is the product of a system-by-system design organization wherein each designer just works around what already exists in the design. With modern numerical-control cutting machines, there is no reason why the casing penetration could not be made at an oblique angle. Also, since it is permitted by the U.S. Navy shipbuilding specifications for certain systems, the fuel-oil fill line could have been incorporated as a bulkhead stiffener. Product organizations of both design and production are required in order to achieve the benefit of integrated thinking.
FRIG04a.JPG: During the late 1970s and early 1980s, while U.S. design firms and shipbuilders, plus others outside of Japan, were still using the traditional system-by-system approach for frigate construction, IHI was applying a product work breakdown structure for warship construction. As shown, a machinery-space block incorporating a flat is laying on its side. Thus all fittings that one worker cannot handle safely, are hoisted into position by a shop crane. Also, detail designers organized pipe runs in parallel on common supports. There are a high percentage of straight pipe pieces, bends are limited to 90 and 45 degrees, and bends are located far enough away from pipe-piece ends so that the flanges may be fitted and welded before bending. Pipe shop productivity was excellent because of how managers disciplined designers.
FRIG04b.JPG: A view of the block shown in photo FRIG04a from its other end. The yellow contraption on the left is part of a platform that is raised and lowered by an ordinary forklift so as to facilitate worker access.

